


API Reference.
I wrote a post a few weeks back on how to get an Avi proof of concept up and running. Hopefully, it helped and continues to help others wanting to start playing with Avi.
I like to spin my lab up and down, pushing config when needed. This post will be focused around the Avi APIs and how to stand up the basic configuration previously discussed.
I used the Avi API guide for reference:
https://avinetworks.com/docs/latest/
Alternatively, you can navigate to:
https://[Avi Controller IP]/api
At this stage, I will assume at least 1 or 3 Controller(s) has been deployed, a logical cloud has been created along with the relevant networks for Avi consumption.
Disclaimer. I will be providing the bare minimum to get a pool and VIP up and running. There are tones of options when using Avi API!
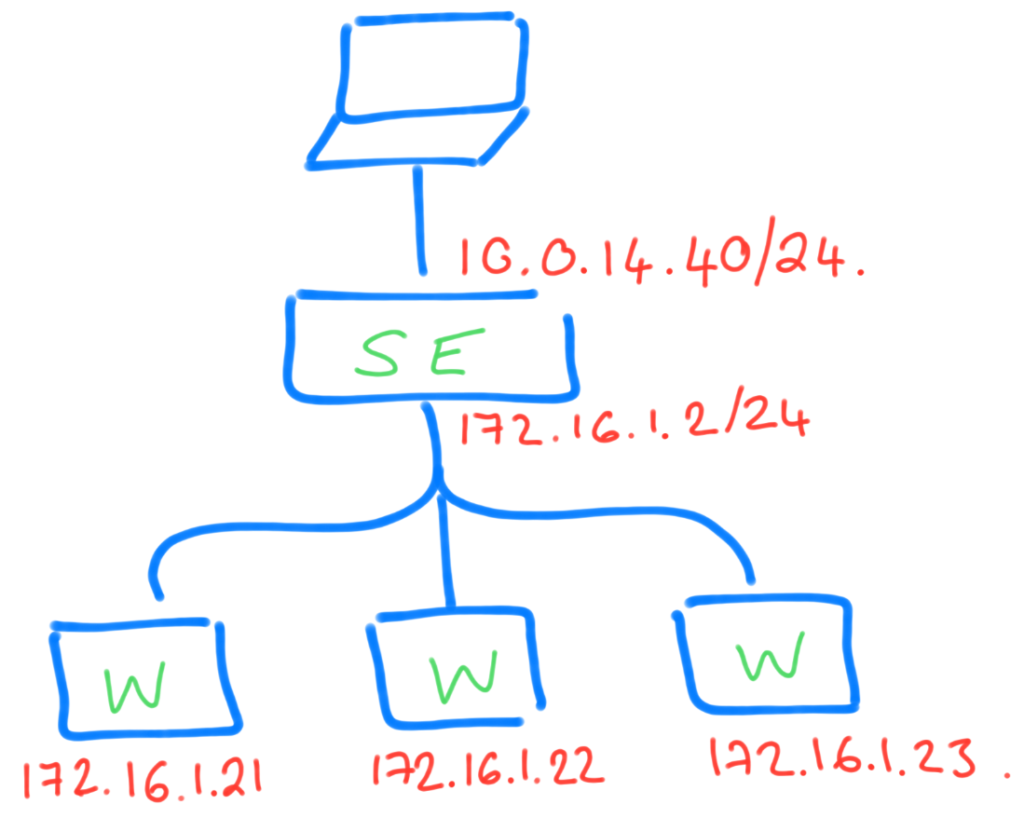
What I’ll end up with?
My VIP will be 10.0.14.40/24 which is part of my predefined pool for the Avi SE’s.
My Pool members will be 172.16.1.21, 172.16.1.22 and 172.16.1.23. Running an HTTP service.
Prerequisites.
You will need a few API calls to learn the Cloud ID and the Network ID used in the later examples.
https://[Avi Controller IP]/api/cloud
https://[Avi Controller IP]/api/network
Authentication.
There are 2 types of authentication when using Avi APIs. The fist is token-based and the second is basic authentication.
I’m still figuring out the token-based but will update the blog as I crack it.
Using basic authentication requires you to edit the controllers using the CLI:
https://avinetworks.com/docs/18.2/http-basic-auth-for-api-queries/
Pools.
POST https://[Avi Controller IP]/avi/pool
Header:
X-Avi-Version = version number e.g. 18.2.8
Content-Type = application/json
Specify your chosen authentication.
BODY:
{
     "cloud_ref": "https://10.0.10.23/api/cloud/[Cloud UUID]",
     "lb_algorithm": "LB_ALGORITHM_ROUND_ROBIN",
     "default_server_port": 80,
     "name": "web_pool",
     "servers": [
         {
             "ip": {
                 "type": "V4",
                 "addr": "172.16.1.21"
             }
         },
         {
             "ip": {
                 "type": "V4",
                 "addr": "172.16.1.22"
             }
         },
         {
             "ip": {
                 "type": "V4",
                 "addr": "172.16.1.23"
             }
         }
     ]
 }
It’s important to note the return response as you’ll need the pool UUID for the VIP creation:
e.g. “UUID”: “pool-40c3fbd2-7873-458f-8718-ab15d728d015”
VIPs.
POST https://[Avi Controller IP]/avi/virtualservice
Header:
X-Avi-Version = version number e.g. 18.2.8
Content-Type = application/json
Specify your chosen authentication.
BODY:
{
     "cloud_ref": "https://10.0.10.23/api/cloud/[Cloud UUID]",
     "pool_ref": "https://10.0.10.23/api/pool/[Pool UUID]",
     "name": "web_vip",
     "vip": [
         {
             "auto_allocate_ip": true,
             "discovered_networks": [
                 {
                 "network_ref": "https://10.0.10.23/api/network/[Port Group UUID]"
                 }
             ]
         }
     ],
     "services": [
             {
                 "enable_ssl": false,
                 "port": 80
             }
         ]
 }
Cleanup.
X-Avi-Version = version number e.g. 18.2.8
Content-Type = application/json
Specify your chosen authentication.
GET https://10.0.10.23/api/virtualservice
    N.B. Virtual Server UUID.

GET https://10.0.10.23/api/pool
    N.B. Pool UUID.

DELETE https://10.0.10.23/api/virtualservice/[Virtual Server UUID]

DELETE https://10.0.10.23/api/pool/[Pool UUID]
Closing.
I’ve only shown the API calls for the GET, POST and DELETE on Pools and VIPs which I believe is the most repeatable task with any Load Balancer. If you want more API calls on the base configuration of Avi or other areas please let me know in the comments or on twitter.
Leave a Reply