

I started the series with a post about why I wanted to use Terraform. Now we have the why out of the way, let’s get to the fun stuff… the how!
I use Terraform for 2 things. The first is to spin up SDDC’s on VMC and configure the VMC NSX-T piece. The second is spinning up NSX-T environments in the lab, which will hopefully make it into production one day. In this post, I’ll focus on the VMC element.
The VMC Environment.
I’ll start by assuming you know what VMC on AWS is and have a high-level understanding of its concepts and what it delivers.
I’ll skip the step for deploying a VMC SDDC using Terraform, but if you want to read how to do that, then check out Nico’s post, which got me started.
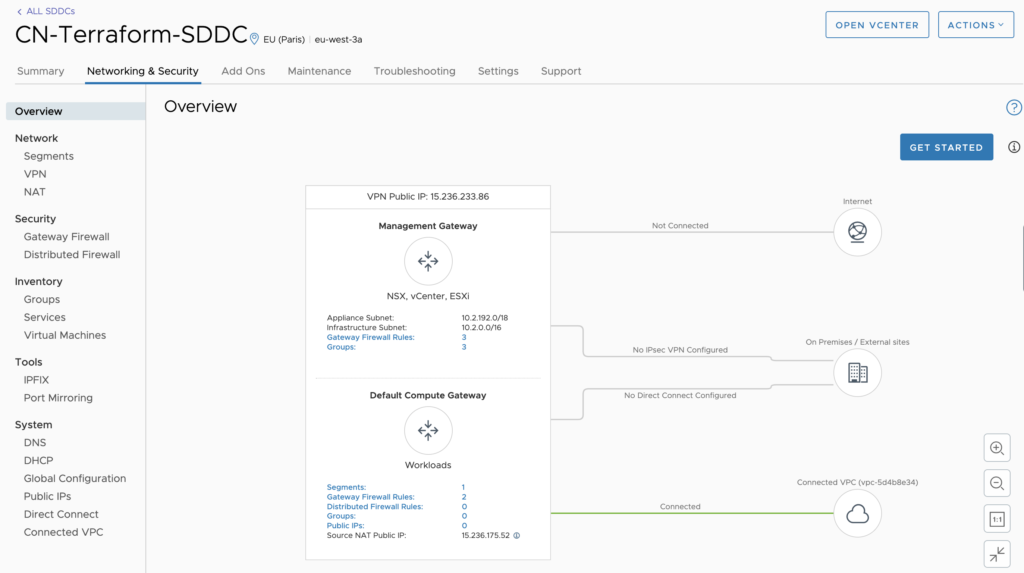
Let’s dive straight into the NSX-T element on VMC and start by discussing a few concepts. When NSX-T is deploying in a VMC environment, it deploys a T0 and 2 T1’s. You, as a user, are unable to change the T0 and the T1’s are preconfigured as a CGW (Cloud Gateway) and an MGW (Management Gateway). The MGW is used for the management components such as vCenter, ESXi hosts and NSX Manager(s). The CGW is used for the workload segments which you deploy later on.
While NSX-T is the SDN of choice for VMC, it isn’t a “fully functioning” version of NSX and there are differences in both the UI and the features. Below is a screenshot of the UI, which you can see differs from the standard NSX view. Functionality is almost identical, but there is no Load Balancing natively within the environment.
Importing the T1 information.
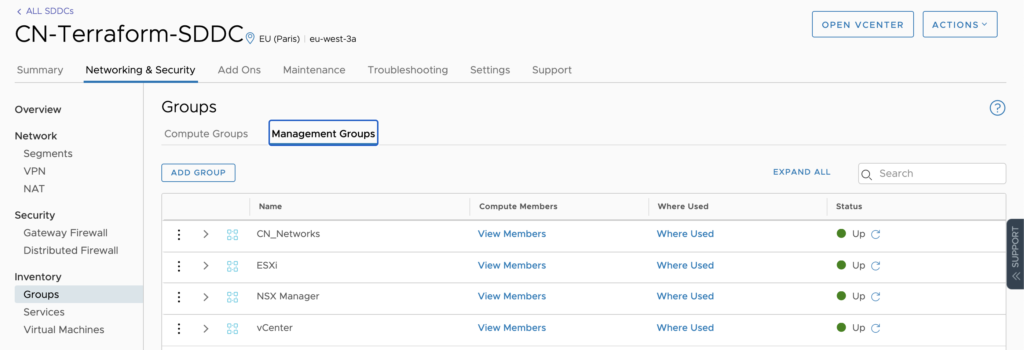
Let’s talk more about the pre-created T1’s, the CGW and the MGW. They are pre-created with some default rules to allow vCenter and ESXi outbound internet access. These rules need to be imported into our Terraform code so that we don’t lose them. Alternatively, we could re-create them, which removes and re-adds the rules.
There are a couple of prerequisites we have to configure before we start. We need to import these T1’s into the Terraform code and the Firewall rules along with it. Let’s start by creating resources for T1 imports.
# Filename policies.tf
# MGW definition
resource "nsxt_policy_gateway_policy" "mgw_policy" {
  category     = "LocalGatewayRules"
  display_name = "default"
  domain       = "mgw"
}

# CGW definition
resource "nsxt_policy_gateway_policy" "cgw_policy" {
  category     = "LocalGatewayRules"
  display_name = "default"
  domain       = "cgw"
}
Update: 13th August 2020.
Gilles Chekroun messaged me about this article and mentioned he and another colleague where caught out trying to ‘terraform destory’ the NSX-T environment. They circumvented this by adding ‘lifecycle { prevent_destroy = true }’ to the MGW and CGW configuration files as below. Thank you Gilles.
resource “nsxt_policy_gateway_policy” “mgw_policy” {
lifecycle { prevent_destroy = true }
resource “nsxt_policy_gateway_policy” “cgw_policy” {
lifecycle { prevent_destroy = true }
Now I’ll import the Firewall rules from both T1’s into the Terraform code.
terraform import nsxt_policy_gateway_policy.cgw_policy cgw/default

terraform import nsxt_policy_gateway_policy.mgw_policy mgw/default
The preconfigured state of the T1’s has now been imported into Terraform. In the past, we could then move on to creating our custom elements, but lately, we need another step. While the pre-created Firewalls have been imported, running a ‘terraform plan’ will suggest removing said rules, this isn’t what we want. Update the ‘policies.tf’ file to the below. This information can be found using the ‘terraform show’ command.
# MGW definition
resource "nsxt_policy_gateway_policy" "mgw_policy" {
  category     = "LocalGatewayRules"
  display_name = "default"
  domain       = "mgw"
  rule {
    action                = "ALLOW"
    destination_groups    = []
    destinations_excluded = false
    direction             = "IN_OUT"
    disabled              = false
    display_name          = "vCenter Outbound Rule"
    ip_version            = "IPV4_IPV6"
    logged                = false
    profiles              = []
    scope = [
      "/infra/labels/mgw",
    ]
    services = []
    source_groups = [
      "/infra/domains/mgw/groups/VCENTER",
    ]
    sources_excluded = false
  }
  rule {
    action                = "ALLOW"
    destination_groups    = []
    destinations_excluded = false
    direction             = "IN_OUT"
    disabled              = false
    display_name          = "ESXi Outbound Rule"
    ip_version            = "IPV4_IPV6"
    logged                = false
    profiles              = []
    scope = [
      "/infra/labels/mgw",
    ]
    services = []
    source_groups = [
      "/infra/domains/mgw/groups/ESXI",
    ]
    sources_excluded = false
  }
}

# CGW definition
resource "nsxt_policy_gateway_policy" "cgw_policy" {
  category     = "LocalGatewayRules"
  display_name = "default"
  domain       = "cgw"
  rule {
    action                = "DROP"
    destination_groups    = []
    destinations_excluded = false
    direction             = "IN_OUT"
    disabled              = false
    display_name          = "Default VTI Rule"
    ip_version            = "IPV4_IPV6"
    logged                = false
    profiles              = []
    scope = [
      "/infra/labels/cgw-vpn",
    ]
    services         = []
    source_groups    = []
    sources_excluded = false
  }
}
Now when issuing the ‘terraform plan’ command, no changes need to be made. This is what we want, no changes to the pre-configured state.
Refreshing Terraform state in-memory prior to plan…
 The refreshed state will be used to calculate this plan, but will not be
 persisted to local or remote state storage.
 nsxt_policy_gateway_policy.cgw_policy: Refreshing state… [id=default]
 nsxt_policy_gateway_policy.mgw_policy: Refreshing state… [id=default]

 No changes. Infrastructure is up-to-date.
 This means that Terraform did not detect any differences between your
 configuration and real physical resources that exist. As a result, no
 actions need to be performed.
Firewall Rules.
I’ll now add some IP groups and some Firewall rules on top of the default configuration. Specifically to allow UI access into the vCenter. Let’s start by creating an IP Group on the MGW for my home/office IP addresses.
resource "nsxt_policy_group" "CN_Networks_MGW" {
  display_name = "CN_Networks"
  description  = "Created from Terraform"
  domain       = "mgw"

  criteria {
    ipaddress_expression {
      ip_addresses = ["1.2.3.4" , "5.6.7.8"]
    }
  }
}
Issuing a ‘terraform plan’ shows the new group will be added to the configuration. Issue a ‘terraform apply’ to push the configuration to the SDDC.
Refreshing Terraform state in-memory prior to plan…
 The refreshed state will be used to calculate this plan, but will not be
 persisted to local or remote state storage.
 nsxt_policy_gateway_policy.cgw_policy: Refreshing state… [id=default]
 nsxt_policy_gateway_policy.mgw_policy: Refreshing state… [id=default]

 An execution plan has been generated and is shown below.
 Resource actions are indicated with the following symbols:
 create
 Terraform will perform the following actions:
 # module.main-NSXT.nsxt_policy_group.CN_Networks_MGW will be created
 resource "nsxt_policy_group" "CN_Networks_MGW" {
 description  = "Created from Terraform"
 display_name = "CN_Networks"
 domain       = "mgw"
 id           = (known after apply)
 nsx_id       = (known after apply)
 path         = (known after apply)
 revision     = (known after apply)
 criteria {
 ipaddress_expression { ip_addresses = [ "1.2.3.4",
 "5.6.7.8",
 ]
 }
 }
 }
 Plan: 1 to add, 0 to change, 0 to destroy.

 Note: You didn't specify an "-out" parameter to save this plan, so Terraform
 can't guarantee that exactly these actions will be performed if
 "terraform apply" is subsequently run.
Let’s now add a Firewall rule allowed the ‘CN_Networks’ into vCenter. These rules have to be placed in the ‘policies.tf’ file as this is where the resource has been created/imported.
    rule {
    display_name          = "vCenter Inbound Rule"
    source_groups         = ["/infra/domains/mgw/groups/49f25c78-6222-4e80-a2bf-2bd213367415"]
    destination_groups    = ["/infra/domains/mgw/groups/VCENTER"]
    services              = ["/infra/services/HTTPS"]
    action                = "ALLOW"
    scope                 = ["/infra/labels/mgw"]
  }
The management access to vCenter has now been configured and my “office users” can now manage the vCenter using the UI.
Workload Segments.
The final element we are going to configure today is workload segments. I will deploy network infrastructure for the typical web, app and database model. Start by creating a new file called ‘segments.tf’. In that file, I have defined the 3 segments and referenced the pre-configured transport zone.
# Reference the Transport Zone
data "nsxt_policy_transport_zone" "TZ" {
  display_name = "vmc-overlay-tz"
}

# Create the segments
resource "nsxt_policy_segment" "web" {
  display_name        = "Web"
  description         = "Terraform provisioned Segment"
  connectivity_path   = "/infra/tier-1s/cgw"
  transport_zone_path = data.nsxt_policy_transport_zone.TZ.path
  subnet {
    cidr              = "192.168.1.1/24"
  }
}

resource "nsxt_policy_segment" "app" {
  display_name        = "App"
  description         = "Terraform provisioned Segment"
  connectivity_path   = "/infra/tier-1s/cgw"
  transport_zone_path = data.nsxt_policy_transport_zone.TZ.path
  subnet {
    cidr              = "192.168.2.1/24"
  }
}

resource "nsxt_policy_segment" "db" {
  display_name        = "Db"
  description         = "Terraform provisioned Segment"
  connectivity_path   = "/infra/tier-1s/cgw"
  transport_zone_path = data.nsxt_policy_transport_zone.TZ.path
  subnet {
    cidr              = "192.168.3.1/24"
  }
}
File Structure.
I have created a number of files within the NSX-T Terraform directory.
ip_groups_mgw.tf
policies.tf
provider_call.tf
segments.tf
variables.tf
Let’s work through them in a logical order and explain what they each do. At this stage, I’d like to mention Terraform files can be named anything you like. Don’t think because I’ve called the file ‘segments.tf’, that you can’t name it ‘bilals_magic_layer2_networkys.tf’. All *.tf files in the directory get reviewed and the combination of these files build out your infrastructure. What does each of my files do?
variables.tf = specify the NSX Manager hostname and the VMC authentication token as variables.
provider_call.tf is the file that calls the ‘nsxt’ terraform provider, which gets download with a ‘terraform init’. It also references the NSX Manager hostname and authentication token.
ip_groups_mgw.tf = Define the IP groups used on the MGW.
polcies.tf = Defines the imported policies and the newly added policies.
segments.tf = Defines the data entry for the transport zone in VMC and defines the 3 segments created for the VMC environment.
Useful Commands.
There are a number of commands I used when creating the environment and blog. Let’s run through them now.
# Used the initialise Terraform and download the defined provider.
terraform init

# Used to format all files in the directory correctly.
terraform fmt

# Used to validate the Terraform files and ensure there are no syntax errors.
terraform validate

# Used to collate the Terraform files and echo changes.
terraform plan

# Used to apply the Terraform files to the resource (VMC).
terraform apply

# Same as 'terraform apply' without the need to confirm after the file checks.
terraform apply --auto-approve
Closing.
The environment build has been fairly basic, but what it does provide is re-usable code to get an environment of your own up and running using Terraform.
Most importantly, we can look at this as a disposable environment, with all this code in place, you can spin it up and down with relative ease moving forward. Once the SDDC is stood up, use the below commands to get that same Network infrastructure put in place within seconds.
terraform init

terraform import nsxt_policy_gateway_policy.cgw_policy cgw/default

terraform import nsxt_policy_gateway_policy.mgw_policy mgw/default

terraform apply --auto-approve
The distinct benefit for me here; is the ability to spin a VMC environment (including NSX-T configuration) up and down in a matter of hours. The SDDC creation taking 99% of the time. This disposable environment type gives me a very cost-effective and quick way of scaling out in case of a planned or unplanned event. It also provides a potential DR solution with a relatively low RTO (few hours).
This post has been very specific to my needs. If there is something you want me to cover, let me know and I’ll either add it to this post or create a new post around the topic.
As always please reach out or follow me if you like the post(s) or want to chat.
LinkedIn
Twitter
How did you authenticate when using the nsxt provider with VMC? Using the reverse proxy or the NSX manager private IP? Can you please share the provider config?
Hi Dan,
I used the reverse proxy with the API token. The .tf file is structured as below.
variable “host” {
description = “VMC NSX-T REVERSE PROXY URL”
default = “nsx-1-2-3-4.rp.vmwarevmc.com/vmc/reverse-proxy/ << ommited >> ”
}
variable “vmc_token” {
description = “API Token”
default = “<< ommited >> ”
}
Good guide. On topic of the need to import ‘nsxt_policy_gateway_policy’, it might be worth pointing out what goes on behind the scenes if you don’t.
My experimentation suggests that without using import pre plan / apply, terraform will appear to create you a new policy e.g.
“path”: “/infra/domains/cgw/gateway-policies/f9cer720-cd42-41af-b645-85010b722987”,
Instead of using… “path”: “/infra/domains/cgw/gateway-policies/default”,
The above path type can be seen in your statefile post plan / apply (without using import). Creation of new rules will then fail (they won’t appear in the vmc browser firewall view) even through the terraform seems to run smoothly (silent failure).