
Introduction
Some months ago someone asked me if I was willing to share exactly how I have setup my nested lab environment. Back then I didn’t have the time, but tonight I am willing to make time to describe just that. So here is part 2 of my homelab post.
Hardware
– 1 x Supermicro SYS-E300-9D-8CN8TP
– 1 x Sandisk Ultrafit 32GB USB 3.0
– 1 x Samsung PM883 240 GB SATA 2.5″ 1.3DWPD
– 2 x Samsung 970 EVO 1 TB NVMe M2 80mm
– 2 x Crucial 64 GB ECC DDR4-2666 LR-DIMM, ECC
As you can see, the seconds NVMe drive has been added to my lab. This was needed to get my vSAN lab to support erasure coding for Raid 5. With only a single NVMe disk of 1TB, I had only enough physical storage to support 3 hosts and some VM’s on top of vSAN. With the second disk added I have enough storage to run 4 nested ESXi hosts.
The configuration
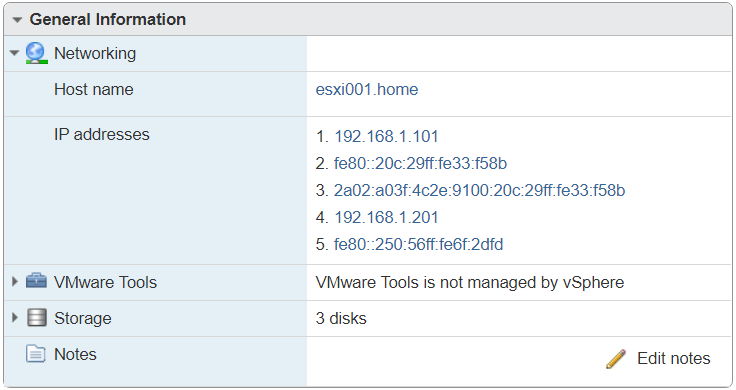
ESXi Host
I like nested labs, because you can protect the core services of your lab, while being able to blow up the other parts of the lab, without having to worry about re-installing and configuring those core components such as DNS, AD, vCenter server, etc.. again.
However, the first server I install is an ESXi server which will provide ‘shared’ resources to my nested lab.
Storage:
All disks are assigned to my first ESXi host. From there I distribute storage to my nested lab.

The 240 GB SSD disk hosts my ISO datastore. And some templates.
I do this to make sure that when I create a new VM, the reads needed, are provided for by this small SSD disk. This part was vital for my homelab when I only had a budget to by 1 NVMe drive. It allowed me to save costs on 2 drives while still having enough space on the NVMe drive to install a small vSAN lab.

You guessed it, the first NVMe disk I bought, is needed to provide storage to my ‘critical services’ and my vSAN cluster. Meanwhile I have added a second NVMe disk and you can find the following VM’s on the ‘real datastore’:

vCenter server, DNS, AD
These services run directly on top of the initial ESXi host, but outside of the nested lab itself. As said before, should my vSAN cluster blow up, at least my core services will still be there.
Because I am at the moment mostly taking care of the architecture of operations and monitoring for some big customers, my vROps nodes run directly on top of my initial ESXi host as well.

Initial vSwitch
The vSwitch on my host only has to cater for basic services. Because I am hosting a nested lab, because I didn’t have the budget for a decent 10 GB switch, I choose to just use a normal small switch without even any VLAN tagging capabilities as my lab switch. (the new switch will hopefully be purchased next year). So my vSwitch on my initial host, has only 2 networks.

Nested host settings
Host resources
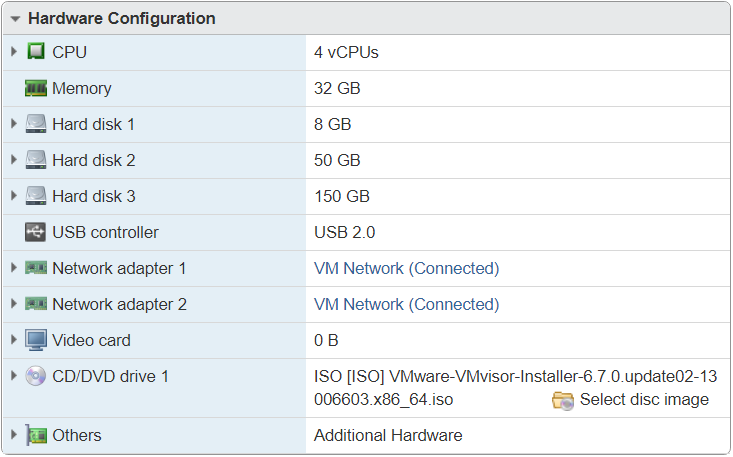
Each host VM has been assigned 4 vCPUs and 32 GB of RAM.
Take note that the ‘Expose hardware assisted virtualization to the Guest OS’ has been enabled on the VMs which are acting as ESXi hosts.

Network settings:
Each VM which acts as a Host, has 2 interfaces on the same network. 1 interface for management traffic and another interface for vSAN networking.
Storage
All hosts have 3 disks created on the NVMe drives. The 8 GB disk to install ESXi on. The 50 GB disks as a cashing disk for vSAN and the 150 GB disks as a data disk for vSAN.
vCenter and vSAN
While vCenter runs on the initial ESXI host, the resources for my vSAN lab run from the nested ESXI hosts.

Also, the other products I am testing, such as a vROps instance to provide Federation, runs on top of my nested vSAN lab. The same applies to my handful of NSX-v and vRLI nodes.
My default storage policy has been configured to support erasure coding (RAID-5) however, most of my VMs are running without protection..
*Kim out*
Please take note that my initial ESXi host is installed on the 32 GB USB pen drive. Somehow I forgot to mention this in the article.