

Right so I have been spending a lot of time working with and learning HCX recently. There are loads of people telling you how great it is and the funky things it can do (and it is great). BUT there are things that can trip you up when deploying it, and every-time I have come across one I have documented it, in the hope that I can help people who deploy it and configure it in the future!
Deploying HCX Manager
Now HCX is a bit of a resource hog, especially when you start deploying the additional appliances, so I was hoping to make full use of my Intel NUCs but that wasn’t meant to be.
HCX Managers need 4x Sockets and the Mesh Appliances need 8x Sockets otherwise they won’t deploy (so unless you run nested ESXi hosts on nucs you are out of luck there).
Now the Manager deploys from the OVA fine but it will not turn on, you can edit the Manager VM and give it a 2×2 vCPU layout to get it working, but you will run into a similar issue with the additional appliances and you won’t be able to edit them, as part of the deployment process it tries to power them on and when it can’t, it just deletes them! 🙁 and editing the vCPU configuration would leave you unsupported!


Getting AD groups working with HCX Manager
Create a vsphere.local group, and then add the AD group into it, then add this vsphere.local group into System Administrator section in HCX, now you can use AD users to log into the hybridity interface
If you read the HCX Design, Deployment and Best Practices guide it is called out in there on page 15 credit to @michael_rudloff for pointing that out
So in my example below I created a vsphere.local group called hcxgroup and added the AD group into that.

Enterprise Administrator is only needed for VMWonAWS deployments, I have been told this needed to be used on older deployments when doing private cloud migrations but now it’s not used outside of VMWonAWS.
Getting HCX talking to vCenter/NSX
The Trusted CA Certificate store, the vCenter and NSX certs need to be added in here before you can link HCX to them, otherwise you will get the errors below:


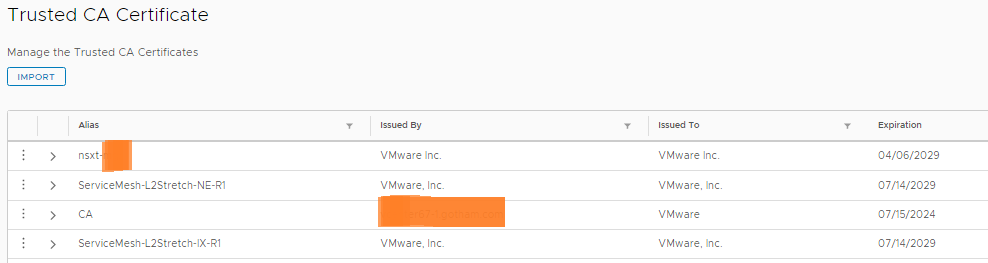
So the hybridity interface (the main user interface) supports the use of custom certificates, the management interface (port 9443) does not support changing of its certs at all.
If after you have done site pairings, you decide to change the SSL certificates for the hybridity interface you will come across this:
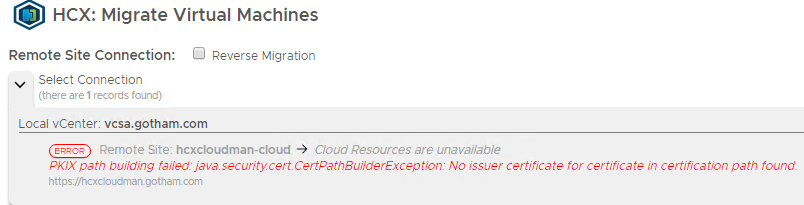
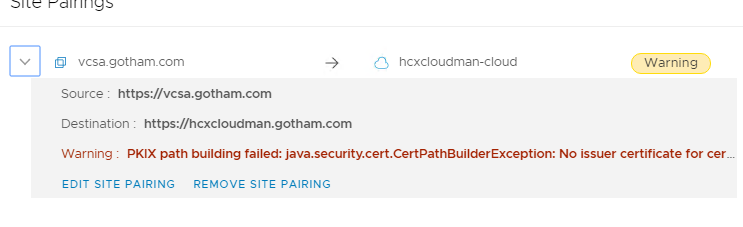
The fix is to go into the admin interface and import the new certs into the Trusted CA store on both HCX Manager appliances. So for me the Enterprise Manager (source side), needs its new certificate adding to the HCX Manager at the cloud sides Trusted CA Store, so they can talk to each other and vice versa
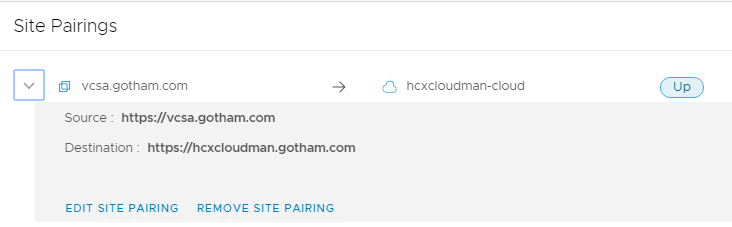
Then stop and start the web service and application service at both sides and it will come back up as below:
Dealing with permission issues
When you are trying to migrate, you may come across permission issues such as the screenshot below:

You can try kicking the services, but I found kicking the Source (Enterprise) and Destination (Cloud) appliance did the trick
NSX-T with HCX
When you delete a Service Mesh the NSX-T Segments are not deleted, so remember this, as it can get messy (2.4.x), as seen below:

Proximity Routing does not work with NSX-T 2.4.x (will do in a future release). If you try it, it will try and deploy the L2 Extension but then halfway through just tear it down with no errors

HCX automatically creates a Segment on the NSX-T T1 Router for the network you are extending. If you try to manually edit this segment on your own, it will not save. Only HCX can do anything with it

When you deploy your IX/WO appliances across site, HCX creates a unique segment in NSX-T for these 2 appliances to sit in, nothing else sits in this segment, as seen below:


So remember to make sure you create a DFW rule for that segment, for me since only those 2 appliances will be in that segment I just created a any/any allow rule for that whole segment ONLY, otherwise, the tunnel will not come up.
Also remember to sort the DFW rules out for any other new segments, as your source FW rules don’t apply here. If you have a default Deny all, any VMs moved across sites will lose access, unless you configure it all correctly

When you do a cut-over of the L2 stretch, there is an option that is very easy to miss!

The gateway you configure (in NSX-T) when creating the stretch is disabled while the stretch is working. If you remove the stretch but don’t tick this box, then the g/w won’t become active. In my testing, I have been unable to manually get the g/w active after that, as that segment was created by HCX and you can’t really manually alter it, even after the fact.
The option shown above is quite hidden on the far right there is a little arrow that when you click it…..it drops down to reveal it!
This is done so you can tear down the stretch and create it anytime you want, you can dictate when the g/w should move. Now when you use PR the same g/w IP becomes active at both sites, but NSX-T ensures that all local VMs to it (cloud side) go out of the local interface to stop tromboning. Then when you kill the link your new g/w is the only one available and life goes on.
The issue is that Proximity Routing is not supported in NSX-T (yet), so during the transition, you have no choice but to accept trombone of traffic across the L2 link to the source site g/w.
@UltTransformer made an interesting observation regarding Proximity Routing:
I think one of the major issues is PR works by advertising /33 routes using OSPF and/or BGP. This can be a pain to set up on the source site.
Some network engineers, like to create a different gateway IP at the cloud side when doing a migration, so your source side has a .1 g/w and the cloud has a .254. This allows them to test to ensure the new g/w and routing is working as expected. They then either change the g/w IP on the migrated VMs to use .254, or they swap the g/w IPs around during maintenance window so the source becomes .254 and the cloud becomes .1.
Now the way it works with NSX-T there does not seem to be a way to bring the g/w online before you kill the stretch so you can do this type of thing. I know from speaking to one networking engineer who has had issues with PR in the past this was his go-to and it can be done in NSX-V, but so far I can’t seem to find a way to do it in NSX-T.HCX Cloud Manager Quirks
HCX Cloud Manager Quirks
The Cloud side sometimes needs static routes, so all traffic leaving the Cloud side to the HCX Enterprise Appliance is forced to go via the gateway defined in the Uplink Profile for the additional appliances. Otherwise sometimes HCX Cloud Manager can get confused and connections do not come up.
This basically means that at the cloud side the HCX VMs can talk to each other over their Management IPs, but any external traffic must leave out of a specific interface. It seems some people need to do this and others do not (I had to do this in my lab)
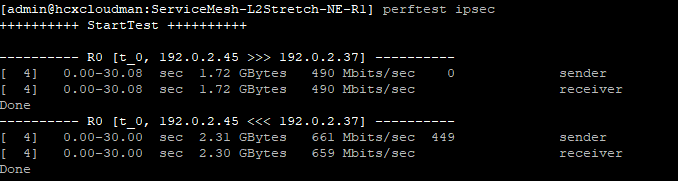
You can add static routes to the appliances using the service mesh and that would be the supported method. Using CCLI to log into them is cool and it can be done that way… But it will need to be redone at any redeploy (patching etc)
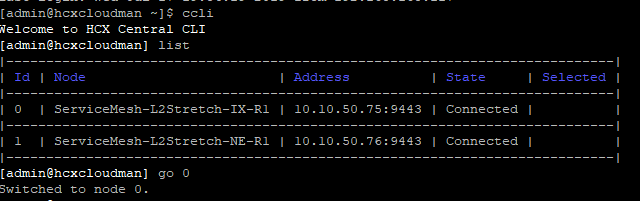
How to SSH into the various appliances
SSH into the HCX Manager to access the other components:

Upgrading HCX
Remember when upgrading HCX, if you are using the L2 extension piece that if the update requires the additional appliances (IX/WO/L2EXT) to be updated you will have some downtime on the L2 Extension. It should hopefully be minimal but you have to be fully aware of this fact and take it into account.
I personally tear down the service mesh before doing an upgrade and then redeploy it afterwards, that works for me but that might not work for everyone.
HCX updates happen at a rapid rate (Approx every 2 weeks) and as a result, there are a few things you need to bear in mind:
The current deployed version must be within the last 3 versions released to receive support. So if you are on version R125, GSS will support you up to and including version R124, R123, R122. Once version R126 is released, GSS will advise to update the version you are on to R123 or above to receive support.
If you can’t do this rapid upgrade cycle for various business reasons, then bare these in mind:
- If version is not updated within 6 releases, functionality will be affected in the product.
- If version is not updated within 12 releases, HCX will cease to function
So based on a 2-week release cycle that is about 3 months and then you may have functionality issues and 6 months HCX will cease to function.
HCX Backup and Restore
So HCX backup and restore can be done via the Management web interface, but the restore is only supported on the same version as the backup was taken. I mean that makes sense, if the backup was taken on R121 then the restore will only be supported on R121. I have no idea if the restore would even work if you restored to R122 for example.
122Now, this raised a query for me as HCX never gave you the option to pick a version to upgrade to. So if you had to do a redeployment and used the ova. It would install say R122 and then it would update you to the latest and greatest build. But if you backup was not from the latest and greatest build…what do you do??!!
Well recently I noticed this has now been addressed:
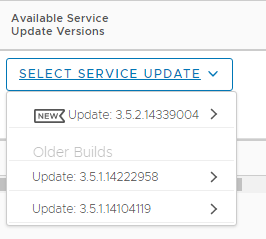
So now it seems you can pick from 3 versions, so as long as you keep pretty recent you should be able to restore fine and remain supported!
Support/Logs
There is an option, that allows support to automatically pull logs from HCX to aid troubleshooting. This option is enabled by default. This might not work in some environments due to security requirements etc. So make sure you are aware of this option and how to disable it!

This toggle option if disabled will stop the ‘auto-pulling’ of logs remotely by support. If you turn this off and GSS support tries to pull logs for this system, the administrator will get an alert and that they can either approve or deny the request.
It’s always on by default. So, if someone doesn’t want it, they can turn it off
Every HCX Manager appliance has a unique system ID and support will probably ask you for this, esp if they want to pull logs remotely, it can be found here:

Misc bit and bobs
- vMotion Migrations go in serial order, you can select up to 100, but they will go 1 by 1 till they are done
- Max Migrations is per Source VC (100 soft limit, 200 with support)
- So if you have a single to many mapping, you can either do 100 to one destination or split it but the total can’t go above 100 at the same time (unless support are involved)
- Most people do 1 site mesh per pair but you can have up to 25 services meshes per Manager
- vExpert NSX Data Center license by default works for only 20 migrations, after that, you need to tear down HCX and re-deploy, then you can re-use the key again. This is for POC/Lab type things
- VM hardware level of at least 9 is needed to do a vMotion Migration of a VM, so anything below has to be cold/bulk migrated, anything blow VM hardware 5 is not supported
Here is the latest released version of the config maxims for HCX :
Various HCX White Papers can be found here:
I would just like to thank @UltTransformer and @michael_rudloff for there various bits of help while I have been learning HCX!

Were you able to reduce the number of vCPUs used by HCX’s deplorable appliances?
‘Deployable” appliances…
Nope if you adjust any of the vcpus/ram the services just do not start!
I think calling them deplorable is fine haha