

At one of my previous customers, I was asked to look into setting up load balancing for EPOPS agents. Unfortunately there was no PKI infrastructure, so I had to use Open SSL. There is a lot of documentation on how to create self-certificates for vROPS but I didn’t find anything on how to create a custom certificate to be used for EPOPS as well. So what follows is a procedure how to create a vROPS certificate using OpenSSL, which you can use for EPOPS agents as well.
Take note that the following has been created using OpenSSL for Windows.
Requirements
Take note that the NSX load balancer will perform SSL Passthrough and that when you configure the EPOPS agent you can only add a single SSL thumbprint. So you have to make sure that when you use multiple remote collectors, all remote collectors have the same SSL certificate. The correct way of doing this is to create a vROPS server certificate with a populated Subject Alternative Names field. This field will have to contain the DNS names of all vROPS nodes and the DNS of the NSX load balancers in this chain.
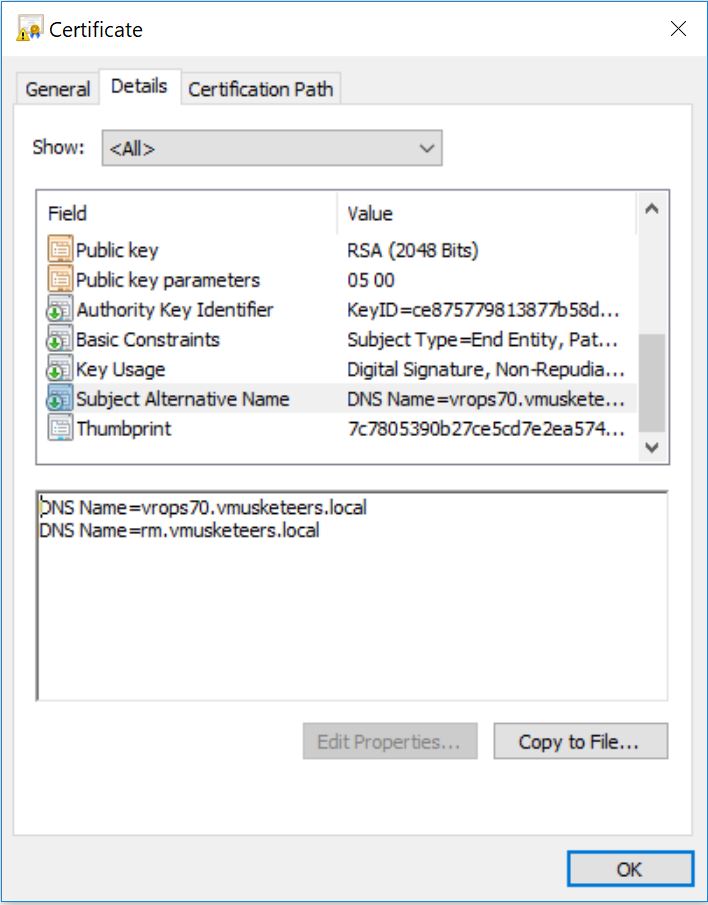
In my test environment I do not have NSX load balancers, so the picture of the server certificate presented at the end of the article only contains the analytical node and a single remote collector.
But in reality, the NSX Loadbalancer needs a DNS entry and it has to be added to this list as well:
DNS.1 = vrops70.vmusketeers.local
DNS.2 = rm1.vmusketeers.local
DNS.3 = rm3.vmusketeers.local
DNS.4 = NSXLoadbalancer.vmusketeers.local
To create the certificate
To be able to create a self-signed certificate which can be used for multiple server, download and install Open SSL. Then proceed with the following:
1. Create a 2048 bit Certificate Authority (CA) private key
genrsa -out VMUSKETEERS-privkey.pem 2048
The CA private key is created: VMUSKETEERS-privkey.pem
2. Create a self-signed CA certificate
req -new -x509 -days 3650 -nodes -key VMUSKETEERS-privkey.pem -sha256 -out VMUSKETEERS-ca.pem
Fill in the following details to create a 2048 bit Certificate Authority (CA) certificate:
CN=VMUSKETEERS.local
O= VMUSKETEERS
OU=VMUSKETEERS
L=Leuven
S=Leuven
C=BE
FQDN server = vrops70.VMUSKETEERS.local
Email address: none
Once finished, the CA certificate is created: VMUSKETEERS-ca.pem
3. Now create the following server configuration file (server.csr.cnf)
You can copy paste the following content into Notepad++ and save it as VMUSKETEERS-server.csr.cnf :
[req]
default_bits = 2048
prompt = no
default_md = sha256
distinguished_name = req_distinguished_name

[req_distinguished_name]
countryName = BE
stateOrProvinceName = Leuven
localityName = Leuven
organizationName = VMUSKETEERS
organizationalUnitName = VMUSKETEERS
emailAddress = info@info.inf
CN = vrops70.vmusketeers.local
4. Create a server Certificate Signing Request (CSR) and server private key.
req -new -nodes -out VMUSKETEERS-server.csr -keyout VMUSKETEERS-server.key -config VMUSKETEERS-server.csr.cnf
As a result the server CSR is created: VMUSKETEERS-server.csr
Also the server private key is created: VMUSKETEERS-server.key
5. Now create a server extension file (server_v3.ext)
You can copy paste the following content into Notepad++ and save it as VMUSKETEERS-server_v3.ext:
Modify the server extension file according to your situation. Take note that the subjectAltNames list has to have ALL vROPS nodes DNS names and ALL NSX Load Balancers DNS names, which are used to load balance EPOPS.
authorityKeyIdentifier=keyid,issuer
basicConstraints=CA:FALSE
keyUsage = digitalSignature, nonRepudiation, keyEncipherment, dataEncipherment
subjectAltName = @alt_names

[v3_req]

subjectAltName = @alt_names
[alt_names]
DNS.1 = vrops70.vmusketeers.local
DNS.2 = rm1.vmusketeers.local
DNS.3 = rm3.vmusketeers.local
DNS.3 = NSXLoadbalancer.vmusketeers.local
6. Create the server certificate
x509 -req -in VMUSKETEERS-server.csr -CA VMUSKETEERS-ca.pem -CAkey VMUSKETEERS-privkey.pem -CAcreateserial -out VMUSKETEERS-server.crt -days 3650 -extfile VMUSKETEERS_v3.ext
The server certificate is created: VMUSKETEERS-server.crt
The serial number file is created: VMUSKETEERS-ca.srl
Each issued certificate must contain a unique serial number assigned by the CA.
It must be unique for each certificate given by a given CA.
OpenSSL keeps the used serial numbers on a file.
The server certificate (server.crt) and server private key (server.key) are the two files you need to install on your server (Apache web server, proxy server).
Always keep the private keys secure:
– CA private key (privkey.pem)
– Server private key (server.key)
7. Combine the following certificates into a single PEM file to be used for VROPS
Open the following files in Notepad++
- VMUSKETEERS-server.key
- VMUSKETEERS-server.crt
- VMUSKETEERS-ca.pem
Combine the content of all three files, including header and trailers into a single new file: VMUSKETEERS -server.PEM. USE THE ORDER AS SPECIFIED ABOVE!!!
- VMUSKETEERS-server.key 2. VMUSKETEERS-server.crt 3. VMUSKETEERS-ca.pem
Install this file on vROPS as a new server certificate.
-----BEGIN PRIVATE KEY-----
MIIEvgIBADANBgkqhkiG9w0BAQEFAASCBKgwggSkAgEAAoIBAQDMvnOEG/R6RtHj
……………………
45p+jCdbKO1dLAgqTtMTGEpg
-----END PRIVATE KEY-----
-----BEGIN CERTIFICATE-----
MIIFLjCCBBagAwIBAgIJAIzRtDH/xS+fMA0GCSqGSIb3DQEBCwUAMIGUMQswCQYD
……………….
2gDSZ4FKAWyQswwYAtkH5kZdzqfavrrc+aUq82vN53f1yQ==
-----END CERTIFICATE-----
-----BEGIN CERTIFICATE-----
MIIEADCCAuigAwIBAgIJAPQpdhdXhRUhMA0GCSqGSIb3DQEBCwUAMIGUMQswCQYD
…………………….
UrCcHI1slOfnjoewMneLRh61DFs=
-----END CERTIFICATE-----
The generated PEM can be used a a certificate for vROPS and will work for EPOPS. Just copy the thumbprint in the EPOPS agent configuration. You can see the subject alternative names in the VMUSKETEERS-server.crt file.
Reference: https://www.mobilefish.com
Leave a Reply